Last updated on August 4th, 2022 at 08:50 am
Windows XP users always wonder on how to configure wifi hotspot on their operating system. Its very easy to configure and the steps are more or less the same in windows 7.
We are manually going to configure the hotspot on windows xp
Requirements
Wifi should be enabled and working properly with the latest driver installed.
How to proceed now? Steps to follow.
- Switch on your WIFI connection.
- Goto MY NETWORK place and click VIEW NETWORK CONNECTIONS
- Inside you will find an icon with some name like WIRELESS NETWORK CONNECTION or SIMILAR
- Right click on that and select PROPERTIES
- Go to WIRELESS NETWORK tab
- Click on ADD under PREFERRED NETWORKS
- Now a new window will open, and it will ask you to provide the network name or SSID.
- Here you can give any name as network name. Some name that will make sense 🙂
- Now CHECK the box which says CONNECT EVEN IF THIS N/W IS NOT BROADCASTING
- Select AUTHENTICATION as SHARED
- DATA ENCRYPTION as WEP
- Give the N/W KEY ie your password for your WIFI HOTSPOT
- Make sure you uncheck the box just below this option which says KEY IS PROVIDED TO ME AUTOMATICALLY, otherwise you will not be able to provide your own password.
- click OK to save the settings.
- Now you can see your new n/w under PREFERRED N/W’s under WIRELESS NETWORKS tab.
- Highlight your network and click the button that says ADVANCED. You can see a new window will open with some options select the option that says COMPUTER TO COMPUTER ADHOC N/W ONLY. Then click close button.
You are almost there.
This is the final step,
- Right click on your LOCAL AREA NETWORK connection icon.
- Select properties and go to ADVANCED tab.
- check on the box that says ALLOW OTHER USERS TO CONNECT THROUGH THIS COMPUTER’s INTERNET
CONNECTION. - Click on OK and you are done. Your WIFI HOTSPOT is ready on WINDOWS XP.
MAKE SURE YOU DONOT CHECK THE OTHER OPTION BOX THAT SAYS ALLOW USERS TO CONTROL OR DISABLE YOUR INTERNET
Now right click on your wireless network connection icon and select VIEW AVAILABLE WIRELESS NETWORK. You will be able to see something like this
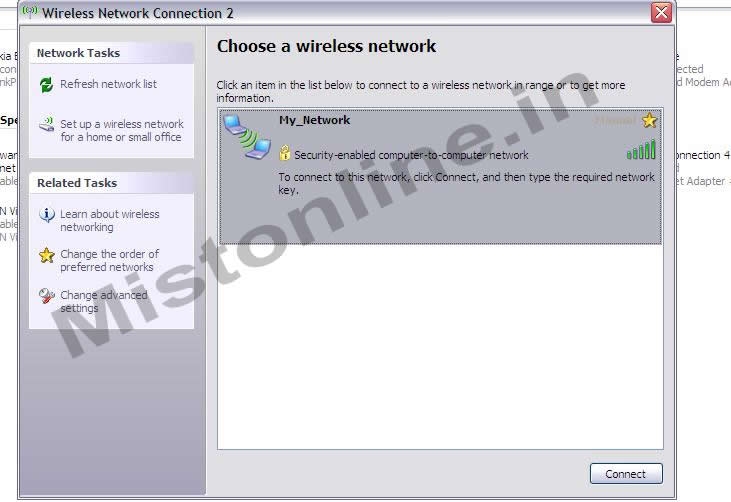
Click on the CONNECT button and wait for sometime for your laptop or computer to connect to it.
Now you can use any device to connect to this new wireless hotspot you created. Enjoy!!