Last updated on June 9th, 2022 at 11:39 am
Sending an email with attachment from your website is really a great add on. To enhance the user experience let us add some HTML content as well. Usually an email configuration is required if you have a contact us page where you want visitors to attach any further information or a web page where users can attach files and send to you etc., Lot of use cases for this.
In this tutorial we are going to dive deep in to how to send proper HTML format email and add an attachment.
First step is to create an HTML Form. Let us name the file as mail.html .
HTML Form
<form name="frm" method="POST" action="success.php" enctype="multipart/form-data">Name<input type="text" name="strname" class="textfield"><p> Address<textarea cols="16" name="straddress"></textarea><p>City<input type="text" name="strcity" class="textfield"><p> State<input type="text" name="strstate" class="textfield"><p>Contact No<input type="text" name="strno" class="textfield"><p>Email<input type="text" name="stremail" class="textfield"><p> Comments<textarea cols="16" name="strcomments"></textarea><p>Resume<input type="file" name="strresume"><p><input type="submit" value="Send" name="submit" onClick="return validate();"> <input type="reset" value="Reset" name="reset"> </form>
Next step is to create a PHP file and process the submitted information from the HTML page. As you can see the form is submitting all the values to a PHP file named success.php, we will be creating the file below so don’t worry.
Also note that in the above form we are asking the user to upload their resume or any file of your choice, This is the field where users are going to attach files.
Resume<input type="file" name="strresume">
Before we proceed some more details regarding the functions and code used in the PHP script.
In the script you can see that I have added 4 file types here. You are free to add any number of file types according to your convenience. This is done as a quick check to make sure that only certain file types are allowed.
if($filetype=="application/octet-stream" or $filetype=="text/plain" or $filetype=="application/msword" or $filetype=="image/jpeg")
ucfirst() function in PHP returns a string with the first character of str capitalized
Base64 Encoding and Mail Header (Important)
In the code below we are extracting the uploaded file content and base64 encoding it first. Encoding the data for safe transit.
$encoded_content = chunk_split(base64_encode($file));
 # Get a random 32 bit number using time() as seed.
 $num = md5(time() );
chunk_split function is used to split string into smaller chunks to match RFC 2045 semantics. ( https://www.ietf.org/rfc/rfc2045.txt )
Let us take a closer look at the headers passed. As you can see we are passing multipart/mixed as the content type first. This means that our email script is composed of a mix of different data types (one is text/html and other one is the attachment format) . Each part is separated by a boundary. Boundaries start with two hyphens (–). The final boundary also concludes with two hyphens (–). $num is the boundary we are defining for this tutorial. It is highly recommended to follow the content definitions I have provided starting with multipart/mixed followed by text/html and finally the attachment.
# Define the main headers.
 $headers= 'MIME-Version: 1.0' . "\r\n";
 $headers.= "Content-Type: multipart/mixed; boundary=\"$num\"";
 $message_get= "--$num" . "\r\n";
 $message_get.= 'Content-type: text/html; charset=iso-8859-1' . "\r\n\r\n";
//HTML Start
 $message_get .= '<html><body>';
 $message_get .= '<h2 style="color:#8da4ec;">';
 $message_get .= '<b>Name- </b>'.$strname.'<br>Address- </b>'.$straddress.'<br>City- </b>'.$strcity.'<br>State- </b>'.$strstate.'<br>Contact No- </b>'.$strno.'<br>Email- </b>'.$stremail.'<br>Comments-</b>
'$strcomments.'';
 $message_get .= "</h1></body></html>". "\r\n";
 //Attach
 $message_get .= "--$num" . "\r\n";
 $message_get .= "Content-Type: $filetype; name=\"$filename\"" . "\r\n";
 $message_get .= "Content-Transfer-Encoding: base64" . "\r\n";
 $message_get .= "Content-Disposition: attachment" . "\r\n\r\n";
 $message_get .= "$encoded_content\r\n";
 $message_get .= "--$num--";
Email and Subject details
Modify the “from” and “subject” accordingly in the script
 $from = "";
 $subject = "This is the subject";
Troubleshooting Whether Email Sent or Not
This part of the code is very helpful as it shows you whether the script has encountered any error during mail processing otherwise it will show you “Mail Sent” message.
 $success = mail($to, $subject,$message_get,$headers);
if (!$success) {
   print_r(error_get_last()['message']);
}
else{
  echo "Mail Sent";
}
We are all set, the final PHP file can be named as success.php and complete code look like the one below
You might also be interested in these scripts,
Email Validation using JavaScript
<?php
 $strname=ucfirst($_REQUEST["strname"]);
 $straddress=ucfirst($_REQUEST["straddress"]);
 $strcity=ucfirst($_REQUEST["strcity"]);
 $strstate=ucfirst($_REQUEST["strstate"]);
 $phone=$_REQUEST["strno"];
 if($phone != ""){ $strno=$phone; } else { $strno="-"; }
 $stremail=$_REQUEST["stremail"];
 $strcomments=ucfirst($_REQUEST["strcomments"]);
 $filename=$_FILES["strresume"]["name"];
 $filetype=$_FILES["strresume"]["type"];
 $size=$_FILES["strresume"]["size"];
 $filetemp=$_FILES["strresume"]["tmp_name"];
 if($filetype=="application/octet-stream" or $filetype=="text/plain" or $filetype=="application/msword" or $filetype=="image/jpeg")
 {
$file=file_get_contents($filetemp);
 $to= $stremail;
// From mail and subject
 $from = "";
 $subject = "";
 # encode the data for safe transit
 $encoded_content = chunk_split(base64_encode($file));
 # Get a random 32 bit number using time() as seed.
 $num = md5(time() );
 # Define the main headers.
 $headers= 'MIME-Version: 1.0' . "\r\n";
 $headers.= "Content-Type: multipart/mixed; boundary=\"$num\"";
 $message_get= "--$num" . "\r\n";
 $message_get.= 'Content-type: text/html; charset=iso-8859-1' . "\r\n\r\n";
 //HTML Start
 $message_get .= '<html><body>';
 $message_get .= '<h2 style="color:#8da4ec;">';
 $message_get .= '<b>Name- </b>'.$strname.'<br>Address- </b>'.$straddress.'<br>City- </b>'.$strcity.'<br>State- </b>'.$strstate.'<br>Contact No- </b>'.$strno.'<br>Email- </b>'.$stremail.'<br>Comments-</b>
 '.$strcomments.'';
 $message_get .= "</h1></body></html>". "\r\n";
 //Attach
 $message_get .= "--$num" . "\r\n";
 $message_get .= "Content-Type: $filetype; name=\"$filename\"" . "\r\n";
 $message_get .= "Content-Transfer-Encoding: base64" . "\r\n";
 $message_get .= "Content-Disposition: attachment" . "\r\n\r\n";
 $message_get .= "$encoded_content\r\n";
 $message_get .= "--$num--";

  # Send email now
 $success = mail($to, $subject,$message_get,$headers);
if (!$success) {
   print_r(error_get_last()['message']);
}
else{
  echo "Mail Sent";
}
 }
else
	{echo "Some error happened";}
?>
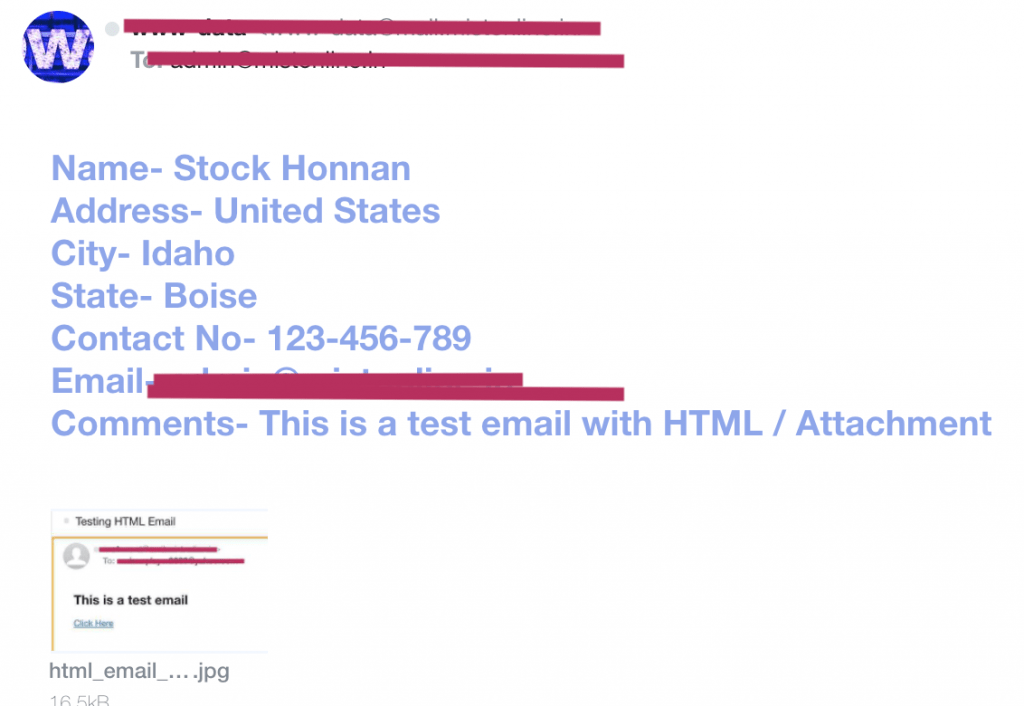
This is how the email looks like. Sample output.

Note: This tutorial has been updated and all issues fixed. Previous submitted Sep 16, 2008. Bugs fixed on May 9, 2016,
Modified some of the logic and Tested successfully on Mar 12, 2022

The script i was looking for….thanks bro..