Last updated on January 5th, 2023 at 10:49 am
Upload image to mysql blob storage and display it using PHP. We are going to discuss more about how to do this in the following tutorial. This also has a password option. So image uploads are secured using password and not everyone can upload or delete them.
Table of Contents
You might also be interested in,Php mysql example image gallery blob storage
Here MySQL mediumblob type is used to store the image. We have updated the code with some extra stuffs.
MySQLi function is being used and the code below will work only for PHP Version 5 Or Above. Keep in mind that saving images in database is not a great approach given the load that the database will have but if you are sure about your code and infrastructure you run can handle these then why not go ahead. This will also give you enough exposure to saving blob (Binary large object ) data in MySQL and also some of the PHP MySQLi functions.
Create MySQL Database
Create a MySQL database with the name mydata_base and run the below query to created a table named My_new_blob_gallery
CREATE TABLE `My_new_blob_gallery` (
  `id` int(11) NOT NULL AUTO_INCREMENT,
  `title` varchar(64) character SET utf8 NOT NULL,
  `ext` varchar(8) character SET utf8 NOT NULL,
  `image_time` timestamp NOT NULL DEFAULT CURRENT_TIMESTAMP ON UPDATE
   CURRENT_TIMESTAMP,
  `data` mediumblob NOT NULL,
  PRIMARY KEY  (`id`)
);
Write PHP Code
Next step is to create a PHP file before we jump on to the entire code lets break it a bit to understand what the code really does.
The first part of the code is just simple declaring all the database related connection details. Make sure to add your database username / password in the code. The $password variable can be updated with any value you like that way it is restricted to people who know the password to upload the image and not just anyone. Just a simple security.
$db_host = 'localhost'; // don't forget to change
$db_user = '';
$db_pwd = '';

$database = 'mydata_base';
$table = 'My_new_blob_gallery';
// use the same name as SQL table

$password = '123';
// simple upload restriction,
// to disallow uploading to everyone
$con=mysqli_connect($db_host, $db_user, $db_pwd,$database);
if (!mysqli_connect($db_host, $db_user, $db_pwd))
    die("Can't connect to database");

if (!mysqli_select_db($con,$database))
    die("Can't select database");
Now let’s take a deeper dive on the POST details. In the script we are checking if a POST method is set, after that the next step is to confirm the password. If these checks looks good the final verification is whether the image is uploaded and title is set. There is also a block that verify if it is an image delete request.
if ($_SERVER['REQUEST_METHOD'] == 'POST')
{
    // cleaning title field
    $title = trim(sql_safe($_POST['title']));

    if ($title == '') // if title is not set
        $title = '(empty title)';// use (empty title) string

    if ($_POST['password'] != $password)  // cheking passwors
        $msg = 'Error: wrong upload password';
    else
    {
        if (isset($_FILES['photo']))
        {
            @list(, , $imtype, ) = getimagesize($_FILES['photo']['tmp_name']);
            // Get image type.
            // We use @ to omit errors
			$file = $_FILES['photo']['tmp_name'];
			$imgsize=$_FILES['photo']['size']/1024;

            if ($imtype == 3) // checking image type
                $ext="png";   // to use it later in HTTP headers
            elseif ($imtype == 2)
                $ext="jpeg";
            elseif ($imtype == 1)
                $ext="gif";
            else
                $msg = 'Error: unknown file format';

			$result = mysqli_query($con, "SELECT * FROM $table");
			$result_check= mysqli_num_rows($result);

            if (!isset($msg) && $result_check <=4 && $imgsize < 48) // If there was no error
            {
                $data = file_get_contents($_FILES['photo']['tmp_name']);
                $data = mysqli_real_escape_string($con,$data);
                // Preparing data to be used in MySQL query
                mysqli_query($con,"INSERT INTO {$table}
                                SET ext='$ext', title='$title',
                                    data='$data'");

                $msg = 'Success: image uploaded '.$imgsize.'KB';
            }
			else
			{
				$msg = 'Error: Upload Failed, try again';
			}
        }
        elseif (isset($_GET['title']))      // isset(..title) needed
            $msg = 'Error: file not loaded';// to make sure we've using
                                            // upload form, not form
                                            // for deletion

        if (isset($_POST['del'])) // If used selected some photo to delete
        {                         // in 'uploaded images form';
            $id = intval($_POST['del']);
            mysqli_query($con,"DELETE FROM {$table} WHERE id=$id");
            $msg = 'Photo deleted';
        }
    }
}
As you can see from the code above you have an option to choose the image formats that can be uploaded to the database. More details on the type ( https://www.php.net/manual/en/function.exif-imagetype.php )
if ($imtype == 3) // checking image type
                $ext="png";   // to use it later in HTTP headers
            elseif ($imtype == 2)
                $ext="jpeg";
            elseif ($imtype == 1)
                $ext="gif";
            else
                $msg = 'Error: unknown file format';
View Uploaded Image
Now viewing the uploaded images is the coolest part of the code. Basically we have a query string with name “show”. From that query string we get the ID of the image that needs to be displayed and it is then forwarded to this block of code to execute sql statement which give us the image data as well as the extension of the image.
elseif (isset($_GET['show']))
{
    $id = intval($_GET['show']);

    $result = mysqli_query($con,"SELECT ext, UNIX_TIMESTAMP(image_time), data
                             FROM {$table}
                            WHERE id=$id LIMIT 1");

    if (mysqli_num_rows($result) == 0)
        die('no image');

    list($ext, $image_time, $data) = mysqli_fetch_row($result);

    $send_304 = false;
    if (php_sapi_name() == 'apache') {
        // if our web server is apache
        // we get check HTTP
        // If-Modified-Since header
        // and do not send image
        // if there is a cached version

        $ar = apache_request_headers();
        if (isset($ar['If-Modified-Since']) && // If-Modified-Since should exists
            ($ar['If-Modified-Since'] != '') && // not empty
            (strtotime($ar['If-Modified-Since']) >= $image_time)) // and grater than
            $send_304 = true;                                     // image_time
    }

    if ($send_304)
    {
        // Sending 304 response to browser
        // "Browser, your cached version of image is OK
        // we're not sending anything new to you"
        header('Last-Modified: '.gmdate('D, d M Y H:i:s', $ts).' GMT', true, 304);

        exit(); // bye-bye
    }

    // outputing Last-Modified header
    header('Last-Modified: '.gmdate('D, d M Y H:i:s', $image_time).' GMT',
            true, 200);

    // Set expiration time +1 year
    // We do not have any photo re-uploading
    // so, browser may cache this photo for quite a long time
    header('Expires: '.gmdate('D, d M Y H:i:s',  $image_time + 86400*365).' GMT',
            true, 200);

    // outputing HTTP headers
    header('Content-Length: '.strlen($data));
    header("Content-type: image/{$ext}");

    // outputing image
    echo $data;
    exit();
}
Create Form
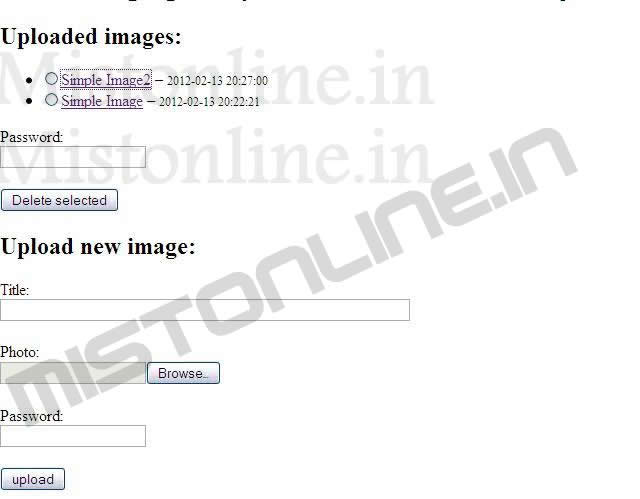
Finally the HTML section which shows the form to upload the image as well as already uploaded image with thumbnails and time of upload. This form also has the capability to delete images.
<html><head>
<title>MySQL Blob Image Gallery Example</title>
</head>
<body>
<?php
if (isset($msg)) // this is special section for
                 // outputing message
{
?>
<p style="font-weight: bold;"><?php echo $msg ?>
<br />
<a href="<?php echo $_SERVER['SCRIPT_NAME'] ?>">reload page</a>
<!-- I've added reloading link, because
     refreshing POST queries is not good idea -->
</p>
<?php
}
?>
<h1>Blob image gallery</h1>
<h2>Uploaded images:</h2>
<form action="<?php echo  $_SERVER['SCRIPT_NAME']?>" method="post">
<!-- This form is used for image deletion -->

<?php
$result = mysqli_query($con,"SELECT id, image_time, title, data FROM {$table} ORDER BY id DESC");
if (mysqli_num_rows($result) == 0) // table is empty
    echo '<ul><li>No images loaded</li>';
else
{
    echo '<ul>';
    while(list($id, $image_time, $title,$data) = mysqli_fetch_row($result))
    {
        // outputing list
        echo "<li><input type='radio' name='del' value='".$id."'/>";
        echo "<a href='https://demo.mistonline.in/gallery_mistonline_blob_demo/?show=".$id."'>".$title."</a>";
	echo '<img width="100px" src="data:image/jpeg;base64,'.base64_encode($data).'">';
	echo "<small>{$image_time}</small></li>";
    }

    echo '</ul>';

    echo '<label for="password">Password:</label><br />';
    echo '<input type="password" name="password" id="password"/><br /><br />';

    echo '<input type="submit" value="Delete selected"/>';
}
?>

</form>
<h2>Upload new image:</h2>
<form action="<?php echo $_SERVER['SCRIPT_NAME'];?>" method="POST" enctype="multipart/form-data">
<label for="title">Title:</label><br />
<input type="text" name="title" id="title" size="64"/><br /><br />

<label for="photo">Photo:</label><br />
<input type="file" name="photo" id="photo"/><br /><br />

<label for="password">Password:</label><br />
<input type="password" name="password" id="password"/><br /><br />

<input type="submit" value="upload"/>
</form>
</body>
</html>
Thats it. You are done. Save all the code above in to a single file named index.php. Make sure you know the password, it is 123. You can see that in the code as well. The page will look like the screenshot below once you start uploading images.
Similar Gallery Script
Thanks!!! 🙂
Thx for this great example! It really works (except the Create-Table-Stmt … ther’s a ‘)’ to much). But anyway – yesterday I’ve spent hours to find out, why my similar script with PHP5.3 and MySQL did not work. You had the solution! Thanks a lot! It’s really a great Script.
how to retrive the images in to my webpage from data base?
thanks
Hello Rajesh,
I have added that section in the code now. It is very easy instead of dynamically adding the image ID in the A HREF tag we can use IMG SRC instead. and call the image..
Hi.. I am stuck and I’m a total newbie at php / mysql .. Would be grateful if someone could help me .. how do I add a function to update the title belonging to the individual picture? Thanks in advance! 🙂
Hello Paso,
First of all thank you very much for your comment. Sorry i didn’t exactly understood what you really need but i think you are asking about image title attribute. If that is the case then all you have to do is change the code where we retrieve image from Mysql
echo "<img width='100' src='".$_SERVER['PHP_SELF']."?show=$id'><br><a href='".$_SERVER['PHP_SELF']."?show=$id'>{$title}</a> – ";To
echo "<img title='".$title."' width='100' src='".$_SERVER['PHP_SELF']."?show=$id'><br><a href='".$_SERVER['PHP_SELF']."?show=$id'>{$title}</a> – ";If otherwise please let me know?
Thanks for your quick reply .. I was not clear enough in my question .. sorry ..
I need help with an update function ..
Instead of deleting a photo and upload it again “just because I need to change the imagetitle or text “I just want to be able to update these title/text-rows !? But I do not know how! 🙁
I guess it could look like this ..
        if (isset ($ _POST [‘update’])) // If used selected some photo to update
        {// In ‘uploaded images form’;
            $ id = intval ($ _POST [‘update’]);
            mysql_query (“UPDATE {$ table} SET title = ‘$ title’, text = ‘$ text’ WHERE id = $ id”);
            $ msg = ‘ Title and Text updated ‘;
        }
I hope you now understand what I mean! 🙂
Sorry for my very bad explanation .. that I would need help with is …
I guess it could start with this? 😉
mysql_query (“UPDATE {$ table} SET title, text WHERE id = $ id”)
I hope you understand what I am looking for and can help me !? 🙂
Not a problem, All you need to do is create a html form and use 2 input fields one for new title and other for old. Hide the old title input field using simple css.
Once all set, Use the below mysql query inside the php code that has the GET or POST functionality.
Now it was a while since I tried to get my problem solved .. Thanks for your help so far .. But I soon give up .. I’ve tried making a new form and do as you said .. but nothing I do seems to work ! I’m doing something wrong! ” .. Can you please show me how to do this? Pleeeease !! 🙂 I would really appreciate it!
I just want to update the title and the text belonging to my pictures!
I’m pretty annoyed at myself right now !! I mean .. how hard can it be? 🙂
where the uploaded photos will be displayed?
Please refer previous comment. I have updated the code accordingly. It will display the images in the “Uploaded Images” section. Please test it from your side.
Thanks dear.
Superb. Thanks a lot.
I want able to change photo and title. i follow above comment but still not success.. can you send me the complete code for able to change photo and title.. Thanks
how to change existing photo?
thanks for this tutorial
which code editor do you use to write code???its very nice.
My thumbnails display a broken image and when I click on the link it tells me it cannot be displayed because it contains errors. Any suggestions would be greatly appreciated! Thank you
Hello Deanna,
Thanks for your comment. Happy to see that you have implemented one of our scripts on your page 🙂
Please let me know in detail the error you are seeing?
Regards
Admin
I like this source code : visit my shopping site that is developed by me.