Last updated on March 12th, 2023 at 02:16 pm
User registration can be found in almost all website. But how a developer creates one? We are using password hash in this tutorial. Thousands of methods to do it but here I am going to share a simple approach of having a user registration feature added to your website using PHP MySQL. This tutorial is intended for all PHP / MySQL beginners who wanted to create user registration page in a splash 🙂
For your convenience I have also included a demo on how it works. Before we proceed with each section of the script lets break this down in to simple steps
Step 1 : Create an HTML form with fields required according to your use-case
Step 2 : Create a MYSQL database with table defining the fields in Step 1
Step 3: Write the PHP Script to process the data from the form(Step 1) after user click submit/register button
Step 4: Now that you have the registration section created, Write a login page using HTML
Step 5: Implement session logic for verifying logged in Users
Step 6 : Add a password strength checker (optional)
- Create HTML Registration Form
- Create a Database And Table in MySQL
- PHP Script To process the form submission data
- Create login form
- Implement session logic for logged in users
- Add Password Strength Check
I know there are hundreds of tutorial on how to create registration forms but thought of sharing my own simple method of using php mysql script for creating a user registration website.
You can also check this tutorial on how to Enable Authentication For PHPMyAdmin?
One of the features we are using here is password hashing. Which means that even if the user enters a password and add it to the MySQL database it will be hashed and will not be readable by anyone else.
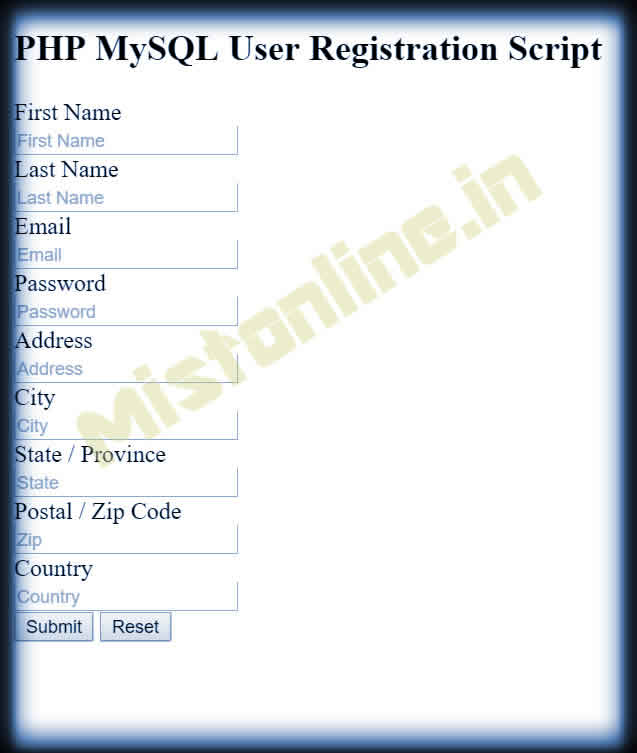
A typical user registration page contains fields like First name, Last Name, Password, Email, Address etc., . So these are the fields I am going to add for my HTML form.
Create HTML Registration Form
Create an HTML page with name My_Registration_Form.html
<form method="post" action="action.php" id="login_form">
<div>
  First Name
  <div>
    <input type="text" id="fname" placeholder="First Name">
  </div>
  Last Name
  <div>
    <input type="text" id="lname" placeholder="Last Name">
  </div>
  Email
  <div>
    <input type="text" id="email" placeholder="Email">
  </div>
  Password
  <div>
    <input type="password" id="password" placeholder="Password">
  </div>
</div>
</div>
  <div>
  Address
  <div>
    <input type="text" id="address" placeholder="Address">
  </div>
</div>
  <div>
  City
  <div>
    <input type="text" id="city" placeholder="City">
  </div>
</div>
  <div>
  State / Province
  <div>
    <input type="text" id="state" placeholder="State">
  </div>
</div>
  <div>
  Postal / Zip Code
  <div>
    <input type="text" id="zip" placeholder="Zip">
  </div>
</div>
<div>
 <div>
  Country
  <div>
<input type="text" id="country" placeholder="Country">
</div>
    </div>
    <div >
      <div>
        <input name="Submit" type="submit" id="submit" value="Submit" class=""/>
        <input type="reset" name="Reset" value="Reset" class="btn"/>
      </div>
    </div>
</form>
Create a Database And Table in MySQL
Next step is to create MySQL database and required tables.
Let us create a database with the name userdata, then create a table named loginform and add corresponding columns. Just copy paste the code below to your Mysql database command line / PHPMyAdmin.
CREATE DATABASE userdata;
USE userdata;
CREATE TABLE loginform (
loginform_id INT(6) UNSIGNED AUTO_INCREMENT PRIMARY KEY,
loginform_firstname VARCHAR(30) NOT NULL,
loginform_lastname VARCHAR(30) NOT NULL,
loginform_email VARCHAR(50),
loginform_pass VARCHAR(255),
loginform_address VARCHAR(150),
loginform_city VARCHAR(50),
loginform_state VARCHAR(50),
loginform_zip VARCHAR(50),
loginform_country VARCHAR(50),
reg_date TIMESTAMP
);
Now the MySQL part is done. All we have pending is to create a PHP code to submit data from the HTML form to MySQL database.
PHP Script To process the form submission data
In the PHP script, I have tried to make the code less complex as possible for your understanding. We are using mysqli_connect instead of the regular mysql_connect function. Make sure to update your Mysql Username / Password according to your requirement otherwise the code will not work.
<?php
//Connect to database from here
$link = mysqli_connect('localhost', 'root', 'mynewpass','userdata');
if (!$link) {
    die('Could not connect: ' . mysqli_error());
}
//select the database | Change the name of database from here

//get the posted values
$fname=htmlspecialchars($_POST['fname'],ENT_QUOTES);
$lname=htmlspecialchars($_POST['lname'],ENT_QUOTES);
$email=htmlspecialchars($_POST['email'],ENT_QUOTES);
$password=htmlspecialchars($_POST['password'],ENT_QUOTES);
$pass = password_hash($password, PASSWORD_BCRYPT);
$pass = trim($pass);
$add=htmlspecialchars($_POST['address'],ENT_QUOTES);
$city=htmlspecialchars($_POST['city'],ENT_QUOTES);
$state=htmlspecialchars($_POST['state'],ENT_QUOTES);
$zip=htmlspecialchars($_POST['zip'],ENT_QUOTES);
$cntry=htmlspecialchars($_POST['country'],ENT_QUOTES);

//now validating the email
$sql_v="SELECT loginform_email FROM loginform WHERE loginform_email='".$email."'";
$result=mysqli_query($link, $sql_v);

//if email exists
if (mysqli_num_rows($result) > 0)
{
echo "Email already exist in Database. Use different email address";
exit();
}
$sql = "INSERT INTO loginform (loginform_firstname, loginform_lastname, loginform_email,loginform_pass,loginform_address,
loginform_city,loginform_state,loginform_zip,loginform_country)
VALUES ('$fname','$lname','$email','$pass','$add','$city','$state','$zip','$cntry');";

if (mysqli_query($link, $sql)) {
    echo "New user created successfully";
} else {
    echo "Error: " . $sql . "<br>" . mysqli_error($link);
}

mysqli_close($link);
?>
This script will validate email address, If it is already existing in the database then user will be prompted to use another email.
Password is also hashed while saving to the database. This provide extra security.
Each form field is validated for HTML Special Characters. Single and double quotes are converted using ENT_QUOTES constant.
htmlspecialchars — Convert special characters to HTML entities
If you want to incorporate Captcha for your HTML form then go to this tutorial PHP Simple Captcha
Create login form
Now that you have completed the registration section lets see how to create a login form for the user. The login form name is login.html
<form action="login.php" method="post">
  <div class="container">
    <label for="uname"><b>Username</b></label>
    <input type="text" placeholder="Enter Username" name="uname" required>

    <label for="psw"><b>Password</b></label>
    <input type="password" placeholder="Enter Password" name="psw" required>

    <button type="submit">Login</button>
  </div>

</form>
Next step is to verify whether the password and username provided matches our database. Since we are using password_hash() in order to decrypt a password we need to use password_verify(). Here is how the login.php file looks like
<?php
//Connect to database from here
$link = mysqli_connect('localhost', 'root', 'mynewpass','userdata');
if (!$link) {
    die('Could not connect: ' . mysqli_error());
}
//select the database | Change the name of database from here

//get the posted values
$email=htmlspecialchars($_POST['uname'],ENT_QUOTES);
$password=htmlspecialchars($_POST['psw'],ENT_QUOTES);
$sql_v="SELECT loginform_pass FROM loginform WHERE loginform_email='".$email."'";
$result=mysqli_query($link, $sql_v);
$row=mysqli_fetch_row($result);
if (password_verify($password, $row[0])) {
    echo 'Password is valid!';
} else {
    echo '<br>Invalid password.';
}
?>
DEMO (Includes both registration and login)
Implement session logic for logged in users
Now we have completed both registration and login system. The next step is to implement a logic to keep the session and configure a logout option for the user.
We do have a dedicated tutorial on implementing simple php login system with session. Take look.
Add Password Strength Check
If you would like to check the password strength, Please use this script on How to implement password strength check on your web page?

