
Last updated on May 10th, 2024 at 08:54 am
This tutorial is a step by step walk through on how to install PHP MySQL Apache on Amazon Linux 2023 EC2 AWS. In just 6 simple steps we are going to configure PHP & MySQL and deploy a sample webpage that connects to MySQL database.
What is Amazon Linux 2023?
Amazon Linux 2023 is the next version of Amazon Linux 2. It is optimized for the cloud, and receives long-term AWS support. AL2023 doesn’t have extras like AL2. SELinux is supported in this release and will be in permissive mode by default. AL2023 comes with dnf for package installation. It follows the same options like YUM. You need to use “dnf check-release-update” command to see the list of available updates. More details, Click Here.
Without further delay lets take a look at the installation steps,
- Step 1: Install PHP 8.1
- Step 2: Install Apache
- Step 3: Install MySQL 8.0
- Step 4: Connect to MySQL – Change temporary password
- Step 5: Check PHP Configuration
- Step 6: Connect to MySQL using PHP
Step 1: Install PHP 8.1
In this tutorial we are going to install the same default PHP version 8.1 which comes with AL2023. If you were using Amazon Linux 2 in the past below public documentations will provide you with Package comparison, New packages included and removed packages.
Make sure you switch to root to perform the package installations
sudo su –
- Updated packages – Version compare packages : https://docs.aws.amazon.com/linux/al2023/release-notes/version-compare.html#version-compare-packages
- List of new packages included in AL2023 by default : https://docs.aws.amazon.com/linux/al2023/release-notes/new-packages.html
- Removed Packages : https://docs.aws.amazon.com/linux/al2023/release-notes/removed-packages.html
Please note that through out this tutorial some of the command output will be truncated for better visibility.
this saves you a lot of scroll
[root@ip-172-31-3-57 ~]$ dnf install php8.1
Last metadata expiration check: 0:19:21 ago on Tue Mar 21 17:23:56 2023.
Dependencies resolved.
=======================================================================================================================
 Package                         Architecture       Version                              Repository               Size
=======================================================================================================================
Installing:
 php8.1                          x86_64             8.1.14-1.amzn2023.0.2                amazonlinux              15 k
Installing dependencies:
 apr                             x86_64             1.7.2-2.amzn2023.0.2                 amazonlinux             129 k
 apr-util                        x86_64             1.6.3-1.amzn2023.0.1                 amazonlinux              98 k
 generic-logos-httpd             noarch             18.0.0-12.amzn2023.0.3               amazonlinux              19 k
 httpd-core                      x86_64             2.4.55-1.amzn2023                    amazonlinux             1.4 M
 httpd-filesystem                noarch             2.4.55-1.amzn2023                    amazonlinux              15 k
 httpd-tools                     x86_64             2.4.55-1.amzn2023                    amazonlinux              82 k
 libbrotli                       x86_64             1.0.9-4.amzn2023.0.2                 amazonlinux             315 k
 libxslt                         x86_64             1.1.34-5.amzn2023.0.2                amazonlinux             241 k
 mailcap                         noarch             2.1.49-3.amzn2023.0.3                amazonlinux              33 k
 nginx-filesystem                noarch             1:1.22.1-1.amzn2023.0.3              amazonlinux              12 k
 oniguruma                       x86_64             6.9.7.1-1.amzn2023.0.2               amazonlinux             216 k
 php8.1-common                   x86_64             8.1.14-1.amzn2023.0.2                amazonlinux             676 k
Installing weak dependencies:
 apr-util-openssl                x86_64             1.6.3-1.amzn2023.0.1                 amazonlinux              17 k
 httpd                           x86_64             2.4.55-1.amzn2023                    amazonlinux              48 k
 mod_http2                       x86_64             2.0.11-2.amzn2023                    amazonlinux             150 k
 mod_lua                         x86_64             2.4.55-1.amzn2023                    amazonlinux              62 k
 php8.1-cli                      x86_64             8.1.14-1.amzn2023.0.2                amazonlinux             3.5 M
 php8.1-fpm                      x86_64             8.1.14-1.amzn2023.0.2                amazonlinux             1.8 M
 php8.1-mbstring                 x86_64             8.1.14-1.amzn2023.0.2                amazonlinux             478 k
 php8.1-opcache                  x86_64             8.1.14-1.amzn2023.0.2                amazonlinux             382 k
 php8.1-pdo                      x86_64             8.1.14-1.amzn2023.0.2                amazonlinux              89 k
 php8.1-xml                      x86_64             8.1.14-1.amzn2023.0.2                amazonlinux             147 k

Transaction Summary
=======================================================================================================================
Install  23 Packages
php8.1-opcache-8.1.14-1.amzn2023.0.2.x86_64             php8.1-pdo-8.1.14-1.amzn2023.0.2.x86_64
  php8.1-xml-8.1.14-1.amzn2023.0.2.x86_64

Complete!
Let us check the version of PHP, this confirms that PHP got installed successfully
[root@ip-172-31-3-57 ~]$ php -v
PHP 8.1.14 (cli) (built: Jan  4 2023 17:23:14) (NTS gcc x86_64)
Copyright (c) The PHP Group
Zend Engine v4.1.14, Copyright (c) Zend Technologies
    with Zend OPcache v8.1.14, Copyright (c), by Zend Technologies
[root@ip-172-31-3-57 ~]$
Let us install the php-mysqlnd driver so that your PHP code can connect to MySQL database
[root@ip-172-31-3-57] $ dnf install php8.1-mysqlnd.x86_64
Last metadata expiration check: 0:27:58 ago on Tue Mar 21 18:49:38 2023.
Dependencies resolved.
=======================================================================================================================
 Package                      Architecture         Version                             Repository                 Size
=======================================================================================================================
Installing:
 php8.1-mysqlnd               x86_64               8.1.14-1.amzn2023.0.2               amazonlinux               151 k

Transaction Summary
=======================================================================================================================
Install  1 Package
Start the PHP-FPM process
[root@ip-172-31-3-57 html]$ systemctl start php-fpm
Confirm that PHP-FPM is now running using status command
[root@ip-172-31-3-57 html]$ systemctl status php-fpm
● php-fpm.service - The PHP FastCGI Process Manager
     Loaded: loaded (/usr/lib/systemd/system/php-fpm.service; disabled; preset: disabled)
     Active: active (running) since Tue 2023-03-21 17:45:05 UTC; 3min 7s ago
   Main PID: 25938 (php-fpm)
     Status: "Processes active: 0, idle: 5, Requests: 1, slow: 0, Traffic: 0req/sec"
      Tasks: 6 (limit: 1125)
     Memory: 10.0M
        CPU: 61ms
     CGroup: /system.slice/php-fpm.service
             ├─25938 "php-fpm: master process (/etc/php-fpm.conf)"
Step 2: Install Apache
When you install PHP as you know by default it will also install HTTPD/Apache (since there is a dependency on HTTPD). Let us check whether HTTPD is installed and confirm the version
[root@ip-172-31-3-57 ~]$ httpd -v
Server version: Apache/2.4.55 (Amazon Linux)
Server built:   Feb 10 2023 00:00:00
[root@ip-172-31-3-57 ~]$
Start Apache
[root@ip-172-31-3-57 ~]$ systemctl status httpd
● httpd.service - The Apache HTTP Server
     Loaded: loaded (/usr/lib/systemd/system/httpd.service; disabled; preset: disabled)
    Drop-In: /usr/lib/systemd/system/httpd.service.d
             └─php-fpm.conf
     Active: active (running) since Tue 2023-03-21 17:45:05 UTC; 5s ago
       Docs: man:httpd.service(8)
   Main PID: 25937 (httpd)
     Status: "Started, listening on: port 80"
      Tasks: 177 (limit: 1125)
     Memory: 12.8M
        CPU: 68ms
     CGroup: /system.slice/httpd.service
             ├─25937 /usr/sbin/httpd -DFOREGROUND
             ├─25944 /usr/sbin/httpd -DFOREGROUND
             ├─25945 /usr/sbin/httpd -DFOREGROUND
             ├─25946 /usr/sbin/httpd -DFOREGROUND
             └─25947 /usr/sbin/httpd -DFOREGROUND

Mar 21 17:45:05 ip-172-31-3-57.ec2.internal systemd[1]: Starting httpd.service - The Apache HTTP Server...
Mar 21 17:45:05 ip-172-31-3-57.ec2.internal systemd[1]: Started httpd.service - The Apache HTTP Server.
Mar 21 17:45:05 ip-172-31-3-57.ec2.internal httpd[25937]: Server configured, listening on: port 80
[root@ip-172-31-3-57 ~]$
Step 3: Install MySQL 8.0
As per Amazon Documentation, they recommend installing MariaDB (a community-developed fork of MySQL). But I know that lot of my visitors would like to install MySQL instead. Here you go and we are going to first install the EL9 repo followed by MySQL community installation.
First use wget to get the package
[root@ip-172-31-3-57 ~]$ wget https://dev.mysql.com/get/mysql80-community-release-el9-1.noarch.rpm
[root@ip-172-31-3-57 ~]$ ls -rlt
total 12
-rw-r--r--. 1 root root 10534 Jul 25  2022 mysql80-community-release-el9-1.noarch.rpm
[root@ip-172-31-3-57 ~]$ dnf install mysql80-community-release-el9-1.noarch.rpm
Last metadata expiration check: 0:04:25 ago on Tue Mar 21 18:43:59 2023.
Dependencies resolved.
=======================================================================================================================
 Package                                  Architecture          Version              Repository                   Size
=======================================================================================================================
Upgrading:
 mysql80-community-release                noarch                el9-1                @commandline                 10 k

Transaction Summary
=======================================================================================================================
Upgrade  1 Package

Total size: 10 k
Is this ok [y/N]:

[root@ip-172-31-3-57 ~]$ dnf repolist enabled | grep "mysql.*-community.*"
mysql-connectors-community     MySQL Connectors Community
mysql-tools-community          MySQL Tools Community
mysql80-community              MySQL 8.0 Community Server
[root@ip-172-31-3-57 ~]$
Now that we have enabled to MySQL repo, let us install MySQL and confirm the version/installation as shown below.
[root@ip-172-31-3-57 lib64]$ dnf install mysql-community-server
Last metadata expiration check: 0:04:33 ago on Tue Mar 21 18:49:38 2023.
Dependencies resolved.
=======================================================================================================================
 Package                                  Architecture     Version                   Repository                   Size
=======================================================================================================================
Installing:
 mysql-community-server                   x86_64           8.0.32-1.el9              mysql80-community            49 M
Installing dependencies:
 mysql-community-client                   x86_64           8.0.32-1.el9              mysql80-community           3.9 M
 mysql-community-client-plugins           x86_64           8.0.32-1.el9              mysql80-community           1.4 M
 mysql-community-common                   x86_64           8.0.32-1.el9              mysql80-community           544 k
 mysql-community-icu-data-files           x86_64           8.0.32-1.el9              mysql80-community           2.2 M
 mysql-community-libs                     x86_64           8.0.32-1.el9              mysql80-community           1.5 M

Transaction Summary
=======================================================================================================================
Install  6 Packages

Total download size: 59 M
Installed size: 335 M
Is this ok [y/N]:y


Installed:
  mysql-community-client-8.0.32-1.el9.x86_64             mysql-community-client-plugins-8.0.32-1.el9.x86_64
  mysql-community-common-8.0.32-1.el9.x86_64             mysql-community-icu-data-files-8.0.32-1.el9.x86_64
  mysql-community-libs-8.0.32-1.el9.x86_64               mysql-community-server-8.0.32-1.el9.x86_64

Complete!
[root@ip-172-31-3-57 ]$ mysql -V
mysql  Ver 8.0.32 for Linux on x86_64 (MySQL Community Server - GPL)
[root@ip-172-31-3-57 lib64]$
Lets start the MySQL service
root@ip-172-31-3-57 ]$ systemctl start mysqld
[root@ip-172-31-3-57 ]$ systemctl status mysqld
● mysqld.service - MySQL Server
     Loaded: loaded (/usr/lib/systemd/system/mysqld.service; enabled; preset: disabled)
     Active: active (running) since Tue 2023-03-21 18:58:02 UTC; 13s ago
       Docs: man:mysqld(8)
             http://dev.mysql.com/doc/refman/en/using-systemd.html
    Process: 33551 ExecStartPre=/usr/bin/mysqld_pre_systemd (code=exited, status=0/SUCCESS)
   Main PID: 33621 (mysqld)
     Status: "Server is operational"
      Tasks: 39 (limit: 1125)
     Memory: 407.0M
        CPU: 6.266s
     CGroup: /system.slice/mysqld.service
             └─33621 /usr/sbin/mysqld

Mar 21 18:57:51 ip-172-31-3-57.ec2.internal systemd[1]: Starting mysqld.service - MySQL Server...
Mar 21 18:58:02 ip-172-31-3-57.ec2.internal systemd[1]: Started mysqld.service - MySQL Server.
We have successfully installed and started MySQL, how do we connect to the server to create database. Let us find that out in the next section.
Step 4: Connect to MySQL – Change temporary password
You need to find the temporary password generated by MYSQL to connect to the service. Check the file named mysqld.log, under /var/log (Default log location).
This temporary password needs to be modified first before any database can be created within MySQL. Once we create a new password the next step is to create a sample database named test_mistonline.
[root@ip-172-31-3-57 ]$ pwd
/var/log
[root@ip-172-31-3-57 ]$ tail mysqld.log
2023-03-21T18:57:53.113753Z 1 [System] [MY-013576] [InnoDB] InnoDB initialization has started.
2023-03-21T18:57:53.949385Z 1 [System] [MY-013577] [InnoDB] InnoDB initialization has ended.
2023-03-21T18:57:56.628183Z 6 [Note] [MY-010454] [Server] A temporary password is generated for root@localhost: 0WCpSgC.-wPP
2023-03-21T18:58:01.038125Z 0 [System] [MY-010116] [Server] /usr/sbin/mysqld (mysqld 8.0.32) starting as process 33621
2023-03-21T18:58:01.053231Z 1 [System] [MY-013576] [InnoDB] InnoDB initialization has started.
2023-03-21T18:58:01.609212Z 1 [System] [MY-013577] [InnoDB] InnoDB initialization has ended.
2023-03-21T18:58:02.066978Z 0 [Warning] [MY-010068] [Server] CA certificate ca.pem is self signed.
2023-03-21T18:58:02.067028Z 0 [System] [MY-013602] [Server] Channel mysql_main configured to support TLS. Encrypted connections are now supported for this channel.
2023-03-21T18:58:02.113106Z 0 [System] [MY-011323] [Server] X Plugin ready for connections. Bind-address: '::' port: 33060, socket: /var/run/mysqld/mysqlx.sock
2023-03-21T18:58:02.113287Z 0 [System] [MY-010931] [Server] /usr/sbin/mysqld: ready for connections. Version: '8.0.32'  socket: '/var/lib/mysql/mysql.sock'  port: 3306  MySQL Community Server - GPL.
[root@ip-172-31-3-57 ]$
As you can see my random password is 0WCpSgC.-wPP . I am going to use that to connect to the server.
[root@ip-172-31-3-57 ]$ mysql -u root -p
Enter password:
Welcome to the MySQL monitor.  Commands end with ; or \g.
Your MySQL connection id is 16
Server version: 8.0.32

Copyright (c) 2000, 2023, Oracle and/or its affiliates.

Oracle is a registered trademark of Oracle Corporation and/or its
affiliates. Other names may be trademarks of their respective
owners.

Type 'help;' or '\h' for help. Type '\c' to clear the current input statement.

mysql> CREATE DATABASE test_mistonline;
ERROR 1820 (HY000): You must reset your password using ALTER USER statement before executing this statement.
mysql> ALTER USER 'root'@'localhost' IDENTIFIED BY 'Mynewpass1234@123!';
Query OK, 0 rows affected (0.01 sec)
mysql> CREATE DATABASE test_mistonline;
Query OK, 1 row affected (0.01 sec)

mysql> show databases;
+--------------------+
| Database           |
+--------------------+
| information_schema |
| mysql              |
| performance_schema |
| sys                |
| test_mistonline    |
+--------------------+
5 rows in set (0.00 sec)

mysql>
Step 5: Check PHP Configuration
For us to test the PHP configuration, first we need to create an index.php file with content as phpinfo() and deploy it under /var/www/html as shown
[root@ip-172-31-3-57 log]$ cd /var/www/html
[root@ip-172-31-3-57 html]$  ls -rlt
total 4
-rw-r--r--. 1 root root 20 Mar 21 17:47 index.php
[root@ip-172-31-3-57 html]$ cat index.php
<?php
phpinfo();
?>
[root@ip-172-31-3-57 html]$
Let us load the web page,
- Copy public ip address of the instance
- paste the IP on a browser
- Port 80 should be opened in Security Group
- Make sure Apache listening on port 80
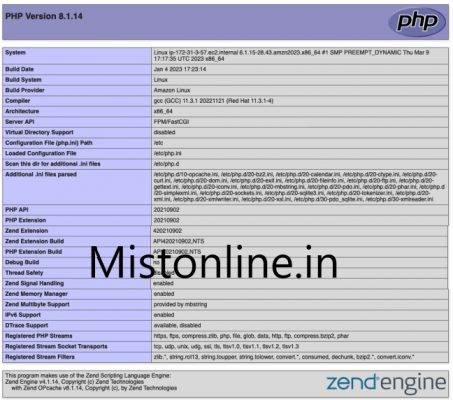
Make sure that MySQLND section is available. This means that you have all the required libraries for PHP installed and is ready to connect to MySQL database using the PHP mysqli statement.

Step 6: Connect to MySQL using PHP
Let us create a file named connect.php and add the lines below, make sure to update the database name/username / password according to your configuration.
<?php
$servername = "localhost";
$username = "root";
$password = "Mynewpass1234@123!";
$db = "test_mistonline";
$conn = new mysqli($servername, $username, $password,$db);
if ($conn->connect_error) {
  die("Connection Failed: " . $conn->connect_error);
}
echo "Connected Successfully";
?>
Load the file through the browser and you should see the below page if everything is configured successfully.
