Last updated on March 28th, 2022 at 01:55 pm
In this tutorial we are going to talk more about how to deploy a simple Python web application in AWS Lambda and access it through AWS API Gateway. We are using greedy path variable in API gateway to configure routes and integrated API Gateway with Lambda. Both API Gateway and Lambda scales to match your request volume automatically. Using AWS Lambda we can write an event driven code as a function. API Gateway is used as a front end to receive web traffic and forward requests to the Lambda Function.
Serverless, a term trending these days which fundamentally means no server. It refers to a deployment in which developers doesn’t have to worry about provisioning any servers to run their application. All you have to worry is writing code and deploy these codes on a cloud service of your choice. Server provisioning is taken care by the cloud providers like AWS, Azure, GCP etc.,. These services have ability to automatically manage underlying resources on your behalf.
Don’t want to read more and go right to the details, then click below
Step 1 : Create a Lambda Function
Step 2 : Create a API Gateway
Step 3 : Application Look and Feel
Step 4 : Check Logs
Step 4 : Demo
Some Take Aways before we start
- We are using proxy while creating API Gateway, with a greedy path variable of
{proxy+} - Integrate with a backend using HTTP, More details on setting up proxy integration
- In the Lambda function you can even make use of templating engine like jinja instead of declaring HTML inside the Python script.
- In our demo we are purposefully hiding some response headers. But the code below still do the complete dump of response headers, you can modify it according to your requirement.
- Be aware of the AWS Lambda and AWS API Gateway Pricing. To configure logs take a look at CloudWatch pricing.
- API Gateway sometimes can be a victim of DDOS attack, so take a look at this Whitepaper from AWS on how to mitigate it.
- For the purpose of this tutorial we are using HTTP API, but take a look at this public document from AWS on choosing between HTTP and REST API
- We are not using S3 for static content or any complex IAM setup to run this basic web application.
Serveless doesn’t make any sense?
Definitely I agree with you on the fact that even if the term Serverless means no server there is of course a server somewhere down the line that process requests on your behalf. Idea here is no more server management like Patching/upgrading/configuring/Security etc.,. All we have to focus is code development, rest is taken care by Cloud Services..
What kind of Application are we going to run ?
This tutorial consist of a simple Python application which accepts GET and POST request from a form, then populates the payload in the webpage. I am also showing how we can extract some parameters from the response header along with the submitted payload. This will be very useful while writing your own application. Added some CSS to look better. My approach here is going to be seamless and straightforward. AWS is huge and going through the specific service documentation will take a while. This tutorial will definitely set some basics for you on how to simply deploy a web app in AWS cloud without much complexities.
Step 1 : Create a Lambda Function
I am using us-east-1 as my region. Use any region of your choice.
- Go To Lambda create function page
- Give any name for the function, I named it mynewfunction
- Choose runtime as Python 3.9 (This the latest supported python version at the time of writing this tutorial)
- Leave everything else default unless you would like to change some settings
- Click Create Function button.
- Replace the default code source and with the one below and hit Deploy button.
Note: Don’t click the “Test” button yet. Even if you do it may throw errors since we are invoking Lambda function directly and not calling via API Gateway. Ignore those errors for now .
import json
import base64

def lambda_handler(event, context):
    # TODO implement
    event_passd = event
    http_data=event['requestContext']['http']
    http_data_method=http_data['method']
    form_style="""input[type=text], select {
  width: 20%;
  padding: 12px 20px;
  margin: 8px 0;
  display: inline-block;
  border: 1px solid #ccc;
  border-radius: 4px;
  box-sizing: border-box;
}

input[type=submit] {
  width: 35%;
  background-color: grey;
  color: white;
  padding: 14px 20px;
  margin: 8px 0;
  border: none;
  border-radius: 4px;
  cursor: pointer;
}

input[type=submit]:hover {
  background-color: blue;
}

div {
  border-radius: 5px;
  background-color: #f2f2f2;
  padding: 20px;
}
</style>"""
    form_html= """<html><body><title>Provide Some Input</title><style>{form_style}</style><h2>Use The Below Form For GET Request</h2><form action="get_request"><label for="fname">Enter Something</label>
    <input type="text" id="sname" name="processtype" placeholder="Write something here.."><br><input type="submit" value="Submit GET Request"></form><h2>Use The Below Form For POST Request</h2><form action="get_request" method="POST"><label for="fname">Enter Something</label>
    <input type="text" id="sname" name="processtype" placeholder="Write something here.."><br><input type="submit" value="Submit POST Request"></form>
    </form></body></html>""".format(form_style=form_style)
    if http_data_method == 'GET':
        try:
            query_string = event['queryStringParameters']['processtype']
        except KeyError:
            return {
        'statusCode': 200,
        'headers': {'Content-Type': 'text/html'},
        'body': form_html}
    else:
        query_string = event
        data=query_string['body']
        data=str(base64.b64decode(data))
        data=data.split("=")
        query_string = data[1]
        query_string=query_string.strip("'")
    data=json.dumps(event_passd)
    style="#data {background-color: #ffcc66;color: #003399;font-family: Comic Sans MS;	font-size: 14px;}"
    http_data_path=http_data['path']
    http_data_ip=http_data['sourceIp']
    http_data_agent=http_data['userAgent']
    http_data_prot=http_data['protocol']
    html = """
<html><body><title>Get Details of {http_data_method}</title><head><style>{style}</style></head><div id="data">RAW Headers, <p>{data} <hr><h2>Parsed Data</h2>Raw Query String : {query_string}
<p><h3>HTTP Details</h3>Method {http_data_method}<p>Path {http_data_path}<p>Method {http_data_prot}<p>UserAgent {http_data_agent}
<p>IP {http_data_ip}</div></body></html>""".format(style=style,data=data,query_string=query_string,http_data_method=http_data_method,http_data_path=http_data_path,http_data_ip=http_data_ip,
http_data_prot=http_data_prot,http_data_agent=http_data_agent)
    return {
        'statusCode': 200,
        'headers': {'Content-Type': 'text/html'},
        'body': html
    }
Step 2 : Create a API Gateway
- Go To API Gateway launch page for HTTP (Same region us-east-1)
- Click on Add Integration, Select Lambda from the drop down
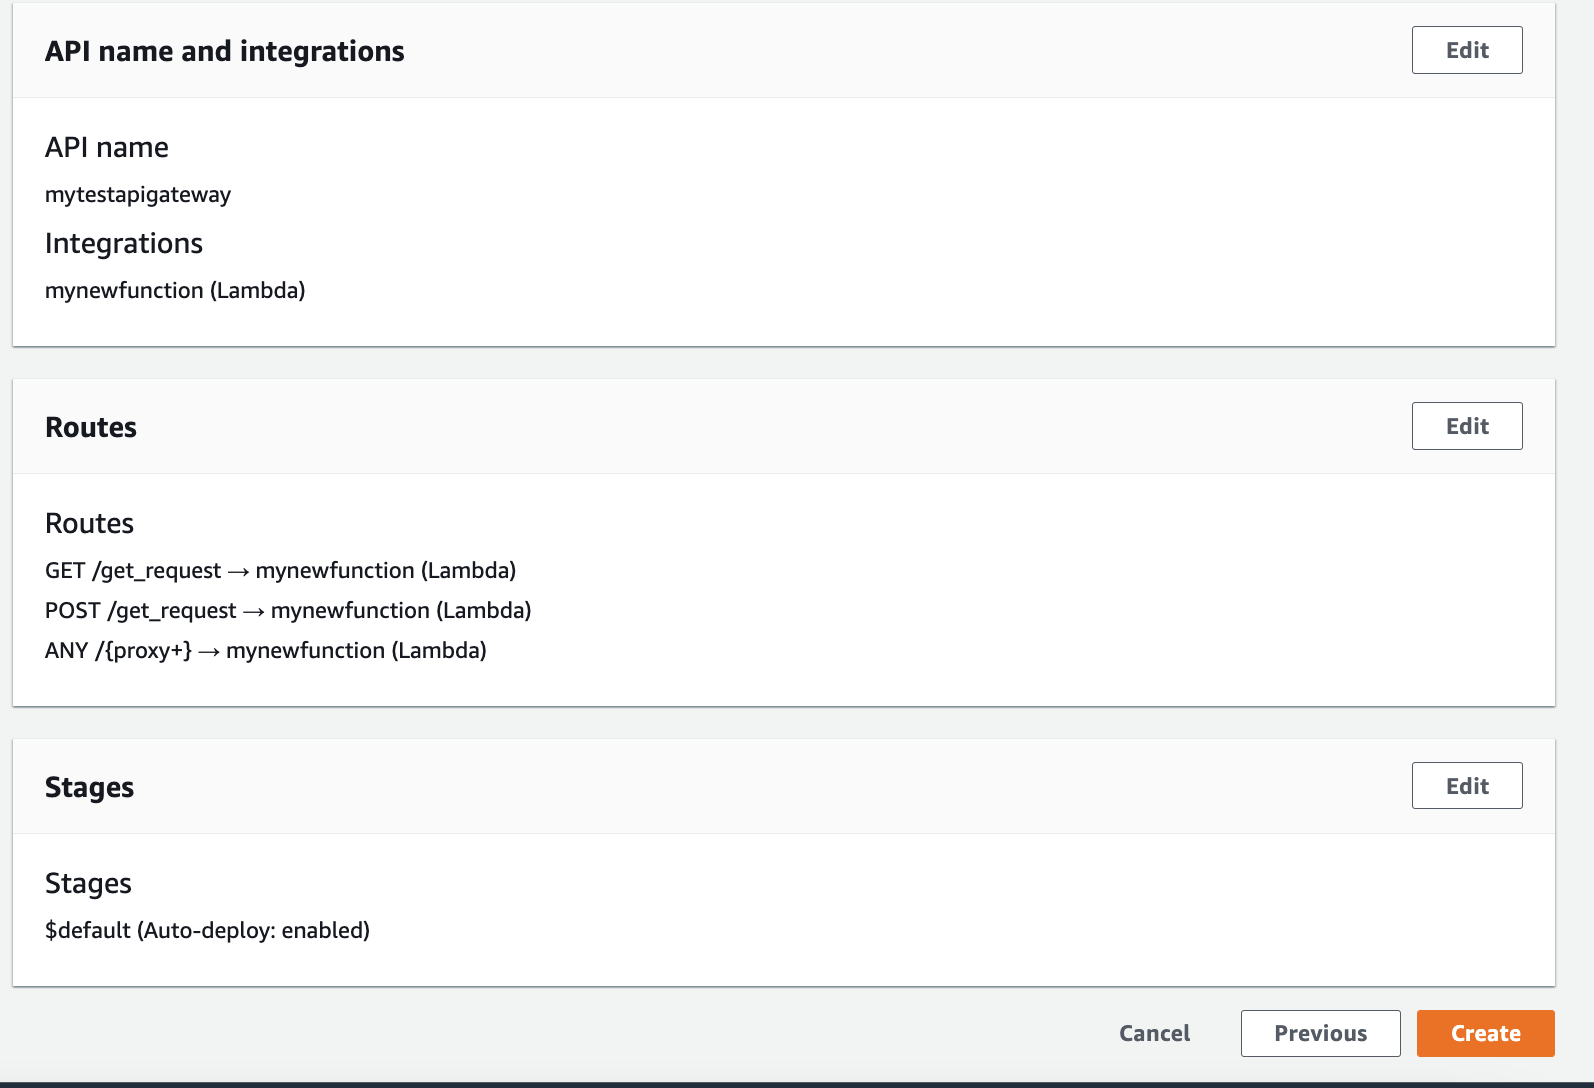
- Add details accordingly along with the lambda function mynewfunction we created in Step 1. My API gateway name is mytestapigateway

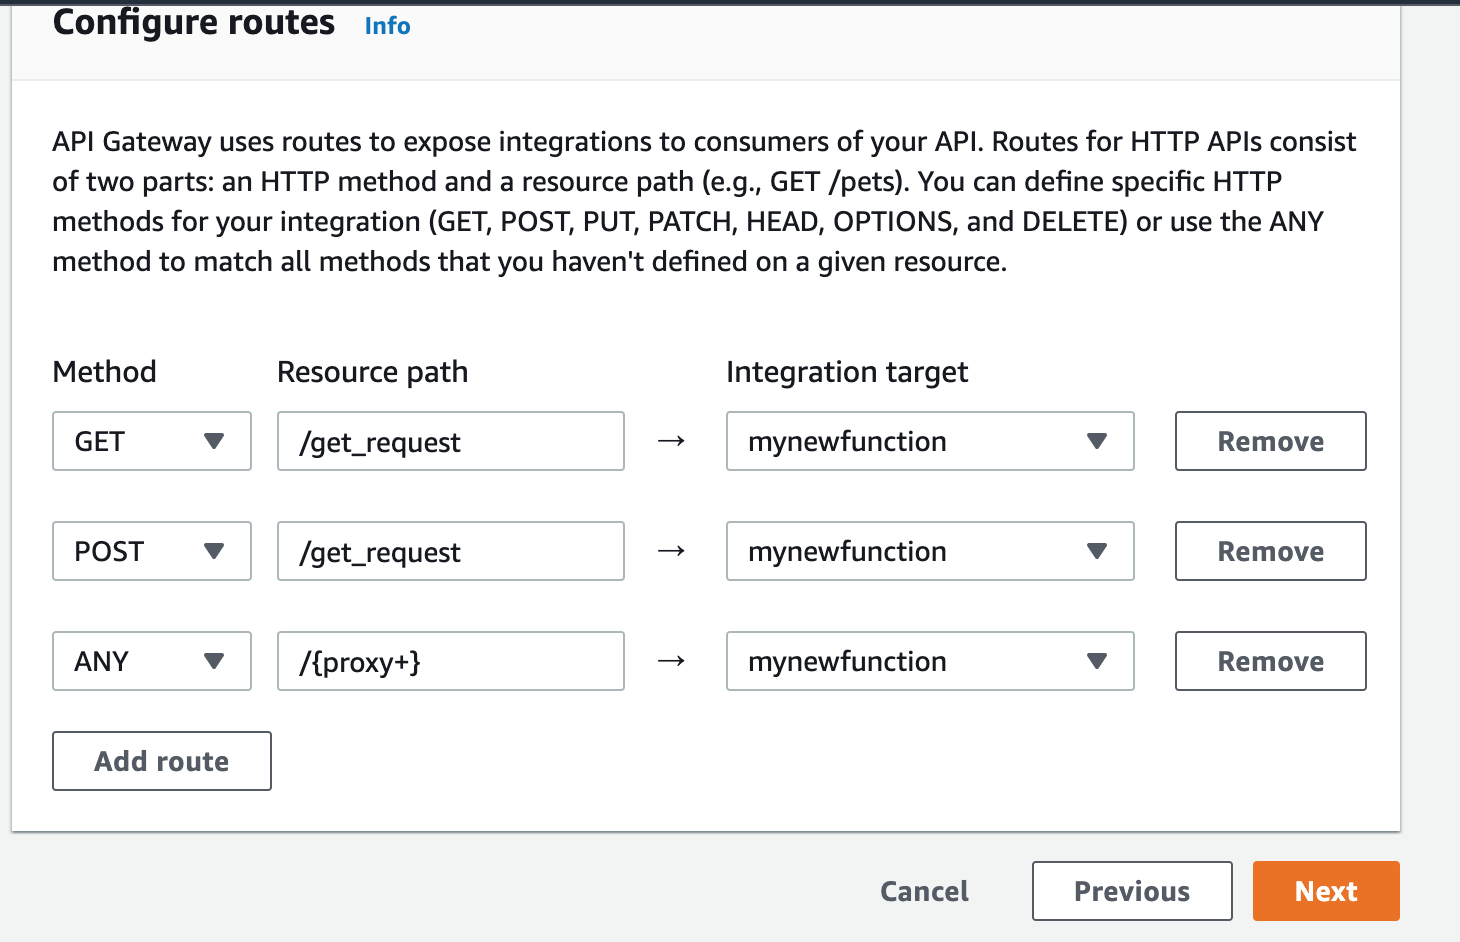
- Click Next and configure these routes I have shown
- Click Next and leave everything in $default stage unless you have a custom stage and want to use it.
- Final page should look like the one below, Click CREATE if everything looks good.
New endpoint will be created. Similar to https://xxx.execute-api.us-east-1.amazonaws.com/ . Region will be different if you have created API gateway in a different region.
You can now hit the URL endpoint created by API Gateway to access the lambda function we deployed.
Step 3 : Application look and feel
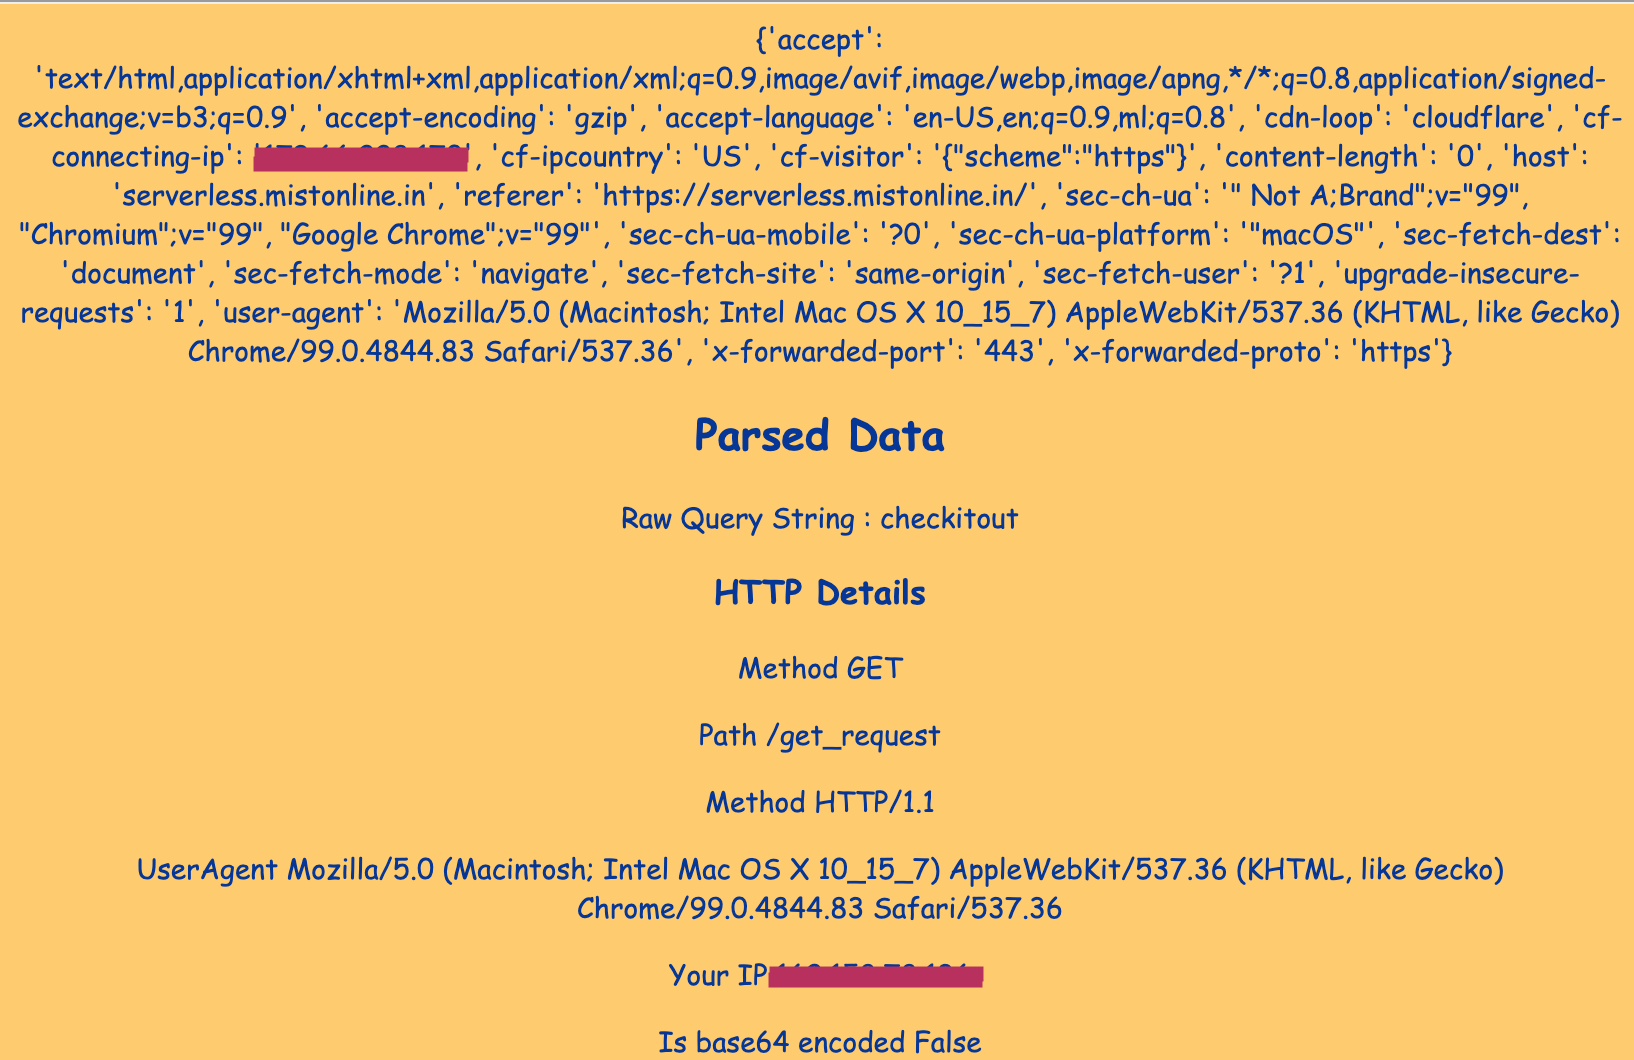
Take a look at the screenshot of how the FRONTPAGE output look like.

Below is the screenshot on how the GET output look. We can see a bunch of cf-* that is basically added by Cloudflare since our demo domain is running behind Cloudflare.
For POST request we will get similar output but difference will be the response we have from Lambda. As you can see below POST response header will have “isBase64Encoded”:true.

This is the reason we have a base64 decode logic (for POST request) to extract from key name body in our Lambda function (encoded data is inside body) . Code snippet below.
        data=query_string['body']
        data=str(base64.b64decode(data))
        data=data.split("=")
        query_string = data[1]
        query_string=query_string.strip("'")
If you would like to change this behavior then take a look at this documentation . You need to basically add “isBase64Encoded”: false header in the Lambda function (REST API) as a response and may have to change the logic of this script we have to get the POST values directly without decoding. This is outside the scope of our tutorial.
Step 4 : Check Logs
In case if you are seeing “Internal Error” or something related on the browser while invoking API Gateway endpoint check the logs.
Step 5 : Demo
Check out our Demo , Kindly note in the demo we are not dumping some of those response headers for security reasons. I hope this tutorial gave you fair picture of how easily we can deploy and run a website in cloud without provisioning or setting up servers and worrying about patching, upgrading, security etc.,