EventBridge is serverless event bus service that enables you to decouple your application thereby making it faster to build , innovate and scale. You can create your own Event Bus and add rules of your choice to deliver events to target based on matched event patterns. A target is an endpoint in which EventBridge forward the request when an event pattern match is found. We are using Lambda function as the target. You can use Python, AWS CLI or any other supported programming languages to put events to EventBridge.
In this tutorial we will be creating Event bus and push payload from a custom Python script / AWS CLI there by triggering an Lambda function as the target.
- Step 1 Create Custom Event Bus
- Step 2 Create Rule and Configure Lambda function as target
- Step 3 Use Python / AWS CLI to put events
- Step 4 Verify CloudWatch logs and service pricing
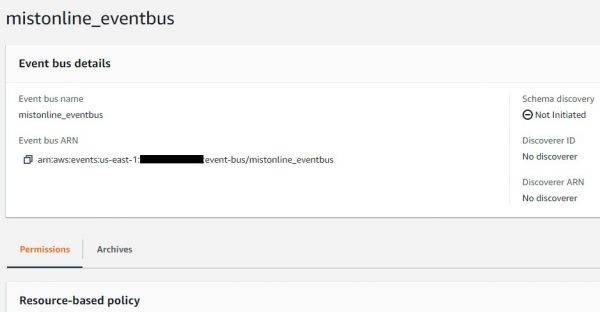
Step 1 Create Custom Event Bus
Let us first create an Event Bus as shown below. I have not changed anything and all options checked are default. Just give some name for the Event bus and click Create
Step 2 Create Rule and Configure Lambda function as target
Create a Rule by giving it a name and description. Make sure the Event bus you select from the dropdown is the same that you created in Step 1 and click Next

Select Event source as Other (Custom events or events sent from more than one source, e.g. events from AWS services and partners.)
Scroll down all the way to the bottom and provide the custom pattern of your choice.
{
 "source": ["user-event"],
 "detail": {
 "Resource_ID": ["987654EFGH"]
 }
}
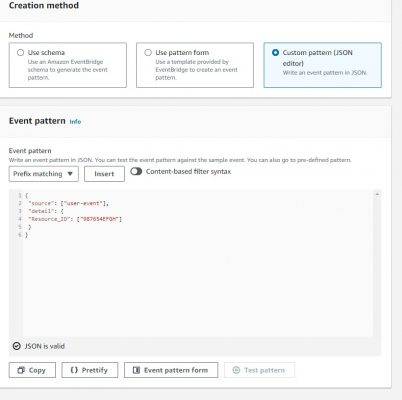
click Next
So in the original payload we are going to push to EventBus going to be covered in Step 3, our idea is to have EventBus rules filter the data by comparing the “source” and “Resource_ID” as shown above, If that doesn’t match it will be ignored by the rules and will never get pushed to the target.
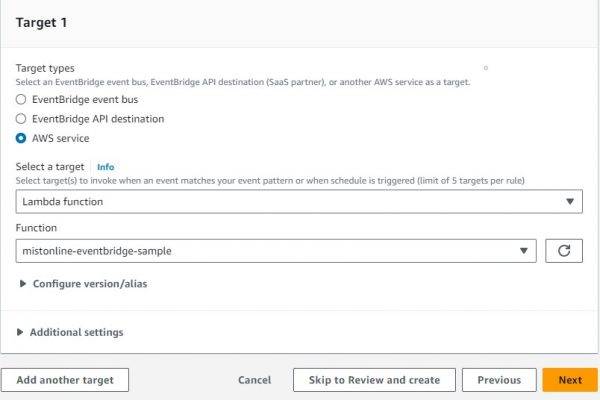
Add Targets
You can add multiple targets if required. We are only adding one Lambda function as our target in this tutorial. I already have a simple Lambda function name mistonline-eventbrige-sample created. If you don’t have one just go to Lambda console(new tab) create a new function and come back to the same page and hit on the refresh button near the Function dropdown.
mistonline-eventbrige-sample lambda function code , simple Python 3.10 function that just print the event it gets.
import json

def lambda_handler(event, context):
    # TODO implement
    print(event)
    return {
        'statusCode': 200,
        'body': json.dumps('Hello from Lambda!')
    }
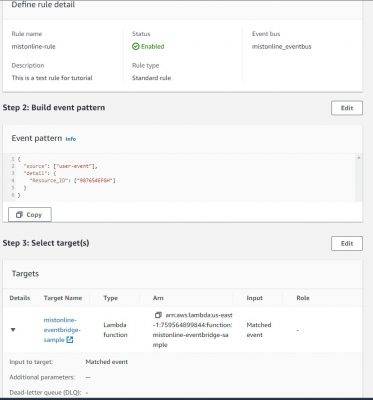
Review of the selections will look similar to the screenshot below
Step 3 Use Python / AWS CLI to put events
Now we have all the settings configured in AWS. The next step is to create a client which pushes payload to Event Bus. I am going to show you how to use AWS CLI and Python to put events to EventBus.
Python Code (Add your region/access_key and secret_key) – Make sure the IAM user you are using has sufficient permission to put events to EventBridge. I am using Python3. Replace the shebang according to your requirement.
#!/usr/bin/python3
import boto3
import json
import sys

if len(sys.argv) == 1:
    print("No arguments passed")
    sys.exit()
value=sys.argv[1]
client = boto3.client('events',
                      region_name='',
                      aws_access_key_id= '',
                      aws_secret_access_key='')

if value == 'start':
    detailJsonString = '{"subject": "Start EC2 Instance","Event": "From Application","origin": "Website","Resource_ID":"12345ABCD"}'
    parsed = json.loads(detailJsonString)
    print(json.dumps(parsed, indent=4))
elif value == 'stop':
    detailJsonString = '{"subject": "Stop EC2 Instance","Event": "From Application","origin": "Website","Resource_ID":"987654EFGH"}'
    parsed = json.loads(detailJsonString)
    print(json.dumps(parsed, indent=4))
else:
    print("only values create and update works as arguments")
    sys.exit()
Entries=[
        {
            'Source':'user-event',
            'DetailType':'my-pref',
            'Detail': detailJsonString,
            'EventBusName':'mistonline_eventbus'
        }
    ]
print(Entries)
response = client.put_events(
    Entries=[
        {
            'Source':'user-event',
            'DetailType':'my-pref',
            'Detail': detailJsonString,
            'EventBusName':'mistonline_eventbus'
        }
    ]
)

print(response)
This python script will accept arguments named start and stop. It push the payload to the Event Bus mistonline_eventbus . Output modified / truncated for better visibility.
Let us now execute the script by adding start as the argument
% ./test_push.py start
{
    "subject": "Start EC2 Instance",
    "Event": "From Application",
    "origin": "Website",
    "Resource_ID": "12345ABCD"
}
[{'Source': 'user-event', 'DetailType': 'my-pref', 'Detail': '{"subject": "Start EC2 Instance","Event": "From Application","origin": "Website","Resource_ID":"12345ABCD"}', 'EventBusName': 'mistonline_eventbus'}]
{'FailedEntryCount': 0, 'Entries': [{'EventId': 'exxx-84xxx'}], 'ResponseMetadata': {'RequestId': '9xx9c9-xxx-49d9-8117-fa8xxx', 'HTTPStatusCode': 200, 'HTTPHeaders': {'x-amzn-requestid': '9xx9c9-xxx-49d9-8117-fa8xxx'', 'content-type': 'application/x-amz-json-1.1', 'content-length': '85', 'date': 'Wed, 05 Sep 2023 1829:15 GMT'}, 'RetryAttempts': 0}}
 %
Now let us add stop as the argument
% ./test_push.py stop
{
    "subject": "Stop EC2 Instance",
    "Event": "From Application",
    "origin": "Website",
    "Resource_ID": "987654EFGH"
}
[{'Source': 'user-event', 'DetailType': 'my-pref', 'Detail': '{"subject": "Stop EC2 Instance","Event": "From Application","origin": "Website","Resource_ID":"987654EFGH"}', 'EventBusName': 'mistonline_eventbus'}]
{'FailedEntryCount': 0, 'Entries': [{'EventId': '1xxx-9dxx'}], 'ResponseMetadata': {'RequestId': '9xxxx-9adc-4b36-a80f-7xxxxx, 'HTTPStatusCode': 200, 'HTTPHeaders': {'x-amzn-requestid': '9xxxx-9adc-4b36-a80f-7xxxxx', 'content-type': 'application/x-amz-json-1.1', 'content-length': '85', 'date': 'Tue, 05 Sep 2023 18:54:11 GMT'}, 'RetryAttempts': 0}}
 %
If we take a closer look at the output of each argument above stop has the Resource_ID as 987654EFGH. Hence as per our Event Bus rule in Step 2, we are only filtering matched pattern “Resource_ID”: [“987654EFGH”] so the CloudWatch logs should only contain this resource ID, let us verify that in the next section.
Note: Event Bridge will ignore “Resource_ID”: “12345ABCD” as it is not part of the Event pattern
Using AWS CLI
You can use put-events CLI, I am a huge fan of AWS CloudShell as it helps you to quickly run scripts with the AWS Command Line Interface (CLI), experiment with service APIs etc., CloudShell comes with 1 GB of persistent storage for your home directory, per Region.
If you are using your own IAM user to run the CLI – make sure permission to put events / EventBridge are added.
I have a test.json file . It contains sample event payload
[{
        "Source": "user-event",
        "DetailType": "my-pref",
        "Detail": "{\"subject\": \"Stop EC2 Instance\",\"Event\": \"From Application\",\"origin\": \"Website\",\"Resource_ID\":\"987654EFGH\"}",
        "EventBusName": "mistonline_eventbus"
}]
Using CloudShell, you can upload this file test.json directly to your home directory or use VI editor.
Use the AWS command line option to put event, keep an eye on the date
[cloudshell-user@ip-10-4-52-237 ~]$ aws events put-events --entries file://test.json
{
    "FailedEntryCount": 0,
    "Entries": [
        {
            "EventId": "fxx03"
        }
    ]
}
[cloudshell-user@ip-10-4-52-237 ~]$ date
Wed Sep  6 17:15:28 UTC 2023
It has executed successfully let us now go and check the Lambda logs and the EventId / time matches (ignore seconds as I took a while to run the date command above)
{'version': '0', 'id': 'fxx303', 'detail-type': 'my-pref', 'source': 'user-event', 'account': 'xxx', 'time': '2023-09-06T17:15:17Z', 'region': 'us-east-1', 'resources': [], 'detail': {'subject': 'Stop EC2 Instance', 'Event': 'From Application', 'origin': 'Website', 'Resource_ID': '987654EFGH'}}
Note: Replace the detail section inside test.json file like the one below then run the command
"Detail": "{\"subject\": \"Start EC2 Instance\",\"Event\": \"From Application\",\"origin\": \"Website\",\"Resource_ID\":\"12345ABCD\"}",
You will still get the EventId even if the event gets ignored by the Event Bus d
[cloudshell-user@ip-10-4-52-237 ~]$ cat test.json
[{
        "Source": "user-event",
        "DetailType": "my-pref",
        "Detail": "{\"subject\": \"Start EC2 Instance\",\"Event\": \"From Application\",\"origin\": \"Website\",\"Resource_ID\":\"12345ABCD\"}",
        "EventBusName": "mistonline_eventbus"
}]
[cloudshell-user@ip-10-4-52-237 ~]$ aws events put-events --entries file://test.json
{
    "FailedEntryCount": 0,
    "Entries": [
        {
            "EventId": "bxxx2-5e5d-1464-f001-ffxxxc2"
        }
    ]
}
[cloudshell-user@ip-10-4-52-237 ~]$ date
Wed Sep  6 17:44:28 UTC 2023
Step 4 Verify CloudWatch logs and service pricing
Now that we have executed the script, let us go to Lambda logs in CloudWatch to view the event logs. For that go to the Lambda function you have added as Target, Under Monitor tab you should click on “View CloudWatch logs” button.

More details on pricing of each resources
Thanks for your time, Feel free to comment in case if you have any questions.